|
There are many research projects underway to develop viable techniques for producing effective tactile renderings. While no methods have as yet been devised to present an accurate depiction of color, shading or depth in tactile form, considerable progress has been made in producing raised drawings.
Microcapsule Paper
Microcapsule paper is one advance in the production of tactile graphics. Microcapsule paper is a special paper onto which millions of thermally-foamed microcapsules have been uniformly coated. These microcapsules of wheat-flour-like form will instantly expand to hundreds of times as much as the original volume upon absorbing the enery of light or heat. [This has been described as the equivalent of a pingpong ball swelling to the size of a volley ball.]
Any material in black and white such as a line drawing, map, graph, illustration, photograph and chart, whether hand-written or printed, can be three-dimentionalized. The drawing can be photocopied onto the capsule paper using a regular photocopier as long as it can handle the thick capsule paper.
To make the stereo copy, the black and white drawing on capsule paper is fed into a special developing machine. While it moves through the machine, the microcapsule paper is irradiated with light energy at a special wavelength, and black portions of the copy absorb the energy and swell outward to form a stereo copy. Information can be added to an existing display and the paper run through the heater once more.
Principle Source: JP TRADING, INC., 300 Industrial Way, Brisbane, CA 94005-1009
Flexi-Paper
Another inovation is Flexi-Paper Tactile Imaging Paper. This paper is imaged by drawing upon it with a soft lead pencil, printing on it or imaging through an office copier. The Flexi-Paper drawing is passed through a machine called a Tactile Image Enhancer which creates a sensory image, that is, any black image on the paper will be raised. Flexi-Paper will not crease and the documents are durable enough to be folded or even crumbled into a ball without distortion of the tactile image.
Principle Source: REPRO-TRONICS INC., 75 Carver Ave., Westwood, NJ 07675
Foil, Collage and Tooling
Still, in spite of such advances, the most widely used methods for producing tactile drawings remain foil, collage and tooling--often used in combination.
The advent of equipment to make plastic copies of relief displays using the vacuum-forming method has enabled the transcriber to utilize a greater variety of line widths and heights, symbols for points or dots, and tactually contrasting textures. Thermoforming is the term which has arisen to refer to the reproduction of plastic copies from a relief master, irrespective of the manufacturer or type of machine involved. The relief master placed on a perforated metal or fiberboard base in a vacuum-forming machine. A sheet of plastic, called Brailon, is placed over the master and fastened in place with a frame to make the four sides of the sheet airtight. A heating unit is pulled over the plastic sheet which is heated for several seconds--the length of time depending on the thickness of the plastic used. Air is sucked out from below, through the holes in the base plate, forming a vacuum that forces the plastic sheet to be molded to the relief of the master. The plastic copy is then peeled from the master.
Source: TACTILE GRAPHICS by Polly K. Edman
Foil Drawings
Foil drawings are made by placing special aluminum foil on a rubber pad and embossing it from the back side with a variety of tools. The metal foil technicque enables the transcriber to make solid, raised lines without resorting to cutting and pasting. It allows an error to be erased so it doesn't show. It also allows flexibility in the height and width of lines and a greater choice of texture. However, access to a Thermoform machine is required as the metal masters must be copied in Brailon before they can be used.
- When tooling aluminum foil make the edges of raised elements as nearly vertical as possible.
- A foil master is not porous so it must be ventilated, i.e., pricked from the front of the diagram with a needle or pin at intervals of about one per square inch (more around any high-rise items) in order to be successfully Thermoformed.
- Foil items should not be fully glued down. The Thermofom process uses heat and different items expand and contract at different rates. Tacking with one or two dots of glue or double-stick tape along either the top or left side should be sufficient to hold and still allow the backing sheet and the foil or collage item to expand and contract withouth ruining the master with creases in the foil or backing sheet.
Collage
Collage, i.e., gluing various materials such as paper, cloth, wood, etc., to the front side of a braille page, provides the greatest contrast in tactile pictures.
- When Thermoforming a collage display, extra care must be taken to enure good copies.
- Collage items should be ventilated around chipboard that covers two square inches or more.
- For the same reasons mentioned above for foil, collage items should not be fully glued down.
- Be careful that there are no undercut edges which will leave an overhang which can be easily torn or cause problems when Thermoforming.
Tooling
Tooling consists of impressing lines, points, and areas on the reverse side of braille paper or foil using special tools. Any neccessary brailling on the page should be done before adding the raised areas. A gum rubber pad is placed under the paper or metal for tooling.
Tools
There are any number of tools that can be used for embossing lines. Some tools are made specifically for preparing tactile graphics, but many everyday items work well. The small diameters of the Howe Press tracing wheel or Grifhold #10 allow for maneuverability even in tight curves, but a dressmaker's spur wheel, while it tends to wobble and is difficult to control with precision, may be used to make satisfactory embossed lines.
Pictured are two dressmaker's spur wheels (left) and two different sized tracing wheels available through Howe Press (right).
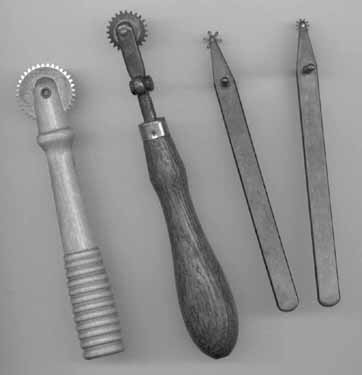
It is not necessary for a transcriber to own a lot of tools in order to make tactile graphics. Two or three good spur wheels can be used to make more than one kind of line by varying the thickness or texture of the padding underneath.
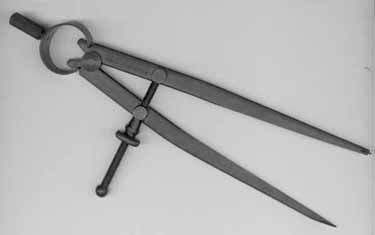
Also pictured is a compass, also available through Howe Press. One tip is pointed and the other has a tiny tracing wheel to draw circles up to 5 1/2" in diameter (in reverse image).
Pads
- There are a variety of pads available, i.e., 1/16 in. thick neoprene rubber from Howe Press, 1/6 in. medium density auto gasket rubber, 1/8 in. very dense auto gasket rubber, very thin rubber bed sheeting, 60-guage smooth upholstery vinyl with supported back, and chipboard.
- The softer the pad, the higher the embossing; the firmer the pad, the lighter the embossing.
- The optimum pad size should be 12 in. by 12 in. to accommodate a full braille page.
- By varying the thickness and/or density of a pad and the pressure applied, contrast can be made with the same tool.
Lines
- Lines are embossed by rolling selected wheels in the appropriate area while applying pressure.
- The same tool can produce a variety of lines by varying pressure on a variety of pad surfaces.
- In general, lines are raised more than textured areas and the greatest elevation is given to point symbols.
- Heavy lines are referred to as "loud" or "noisy."
- It is difficult to tool a satisfactory heavy, smooth line on braille paper. Heavy, smooth lines can be made by gluing thread or cord in place on the front side of the paper.
- A rough, sharp line or area can be read more easily than the same size line or area of a comparatively smooth texture.
- Primary information should be represent with rough, sharp lines; secondary information should be represented by a somewhat lower, smoother line.
- When contrast is not necessary the same tool may be used for all lines.
- A lead line is the line that connects a diagram element to its label.
- Lead lines should be used sparingly.
- There should be at least 3/32 in. between two lines in a finished diagram. This is about the distance between two adjoining braille cells.
- No line segment should be any less than 1/2 in. in order to be discriminable. This rule does not apply to scale marks on clock faces, number lines, etc., or to "dashes" in broken lines.
Points
- The most commonly used point symbol is an oversized dot (approx. 3/16 in. in diameter).
- Oversized dots can be made with an assortment of tools and materials including a teflon braille eraser and the Howe Press Jumbo Freehand Drawing Stylus.
- Most point symbols are tooled by firmly holding the tool perpendicular to the paper or metal and lightly tapping it with a mallet or small hammer.
- Dots can be made using punch-outs of leather or chip-board, layered to the desired height.
- Hollow dots can be produced from chipboard by punching a smaller hole in the original punch-out.
- Chipboard or tooled triangles make satisfactory point symbols.
- As with lines, rough or higher texture makes the points more distinctive.
Areas
- When two or more textured areas are to be used within one diagram, the heavier, rougher texture should be reserved for the most important area.
- Heavily textured areas are referred to as "loud" or "noisy."
- A rough-textured area will automatically feel higher than smoother textured areas.
- Elevating an area above its adjoining areas makes for more contrast.
- Contrast is intensified if the elevated areas has sharp, nearly vertical edges.
- Appropriately shaped chipboard under a glue-on texture can raise the area to the desired height.
- Tools used for lines can be used to produce texture in an area.
|